

Photo by Justin Morgan on Unsplash
Add blog posts to your React site using the Hashnode API, Typescript and GraphQL


If you are like me and like blogging from time to time it's nice to be able to fetch your posts and add them to your own personal site without the hassle of finding a headless CMS or hosting your own solution. Hashnode provides the perfect balance between acting as a CMS and being a blogging platform at the same time.
This is made possible by the fact that Hashnode exposed a GraphQL API where you can get the list of posts, as well as individual posts. This is in contrast to other popular tech blogging platforms like Medium and dev.to, where they don't allow fetching at all, or only allow fetching a list of your posts.
This is the biggest reason for me to start using the Hashnode platform and so far it has worked without a hitch, and their GraphQL API allows me to create end-to-end type-safety while interacting with their API. Add the fact that you can back up your posts in GitHub and I'm pretty sold on the concept.
You can see all the source code provided with the working example here on Github: github.com/ugglr/nextjs-hashnode-graphql-blog
In this article we will:
Bootstrap a React.js Typescript project using Next.js.
Set up Apollo GraphQL client and integrate it into our project.
Set up GraphQL Codegen for generating types & type-safe queries
Create an index page that holds a list of all our posts.
Generate individual static blog pages for all our posts.
We will not:
Go into the basics of Next.js.
Do much styling.
Set up a webhook for rebuilding our site when a new post is added to your Hashnode.
You will need:
Hashnode account with blog posts in it
Development environment able to run a bootstrapped Next.js project.
Bootstrapping project & installing dependencies.
Step 1 - Init a new Next.js project
We start by bootstrapping a new Next.js project with TypeScript and the default settings.
yarn create next-app
After that, we can install the necessary dependencies for making all the magic happen.
Step 2 - Init and Install Apollo Client
yarn add @apollo/client graphql
After that, I'm creating a folder called lib the root of the directory, and inside it, I'm creating a file called apollo.ts. This file will hold the logic for creating a new client that can be used server-side since we won't need any client fetching of data. All pages will be static or server-side rendered.
If you don't know the difference between these I recommend reading Next.js docs in the data fetching section here 👉 Data Fetching: Overview 👈
lib/apollo.ts
import { ApolloClient, InMemoryCache } from "@apollo/client";

export const createClient = () => {
  const client = new ApolloClient({
    uri: "https://api.hashnode.com/",
    cache: new InMemoryCache(),
  });

  return client;
};
This is the default initialization of an Apollo Client as described in their docs. Read more here. The only difference is that I'm pointing the client to the Hashnode API endpoint https://api.hashnode.com since that's where we are going to fetch our posts.
Step 3 - Install GraphQL CodeGen
Thanks to the magic of GraphQL and TypeScript we can generate end-to-end type-safe data fetching between our application and the server/API. This is a one-time setup and will speed up development in the future eliminating type errors, and validating our schemas.
Run the following command to install the packages we need to make this happen:
yarn add -D @graphql-codegen/cli @graphql-codegen/typescript @graphql-codegen/typescript-graphql-request @graphql-codegen/typescript-operations
This will install the following packages as devDepencencies
@graphql-codegen/cli@graphql-codegen/typescript@graphql-codegen/typescript-graphql-request@graphql-codegen/typescript-operations
I recommend checking them out on npmjs-website ☕️
Step 4 - Configure GraphQL Codegen
In the root of the project create a file called graphql.codegen.yml, this file will hold the configuration for our code generation.
schema:
  - "https://api.hashnode.com"
documents:
  - "./graphql/**/*.graphql"
generates:
  ./generated/graphql.ts:
    plugins:
      - typescript
      - typescript-operations
The configuration file does the following:
schemaThis points to our GraphQL endpoint for fetching the API schema map.documentsThis tells GraphQL Codegen where to look for our schema filesgeneratesThis tells GraphQL Codegen where to create and store our generated code.pluginsSpecifies what GraphQL Codegen plugins it shall use.
The thing we need to do is add the code-generation script to our package.json
Inside scripts add this line:
{
    "scripts": {
        ...
        "generate": "graphql-codegen --config ./graphql.config.yml",
        ...
    }
}
At this point if we try to run the generation-script we will get the following output:
yarn generate
yarn run v1.22.15
$ graphql-codegen --config graphql.codegen.yml
(node:42491) ExperimentalWarning: stream/web is an experimental feature. This feature could change at any time
(Use `node --trace-warnings ...` to show where the warning was created)
✔ Parse Configuration
⚠ Generate outputs
  ❯ Generate to ./generated/graphql.ts
    ✔ Load GraphQL schemas
    ✖
      Unable to find any GraphQL type definitions for the following pointers:
      - ./graphql/**/*.graphql
    ◼ Generate
error Command failed with exit code 1.
info Visit https://yarnpkg.com/en/docs/cli/run for documentation about this command.
Even though we are thrown an error here it means we have successfully installed our code generator. The error is because we have not yet defined any graphql schemas in the folder graphql.
Step 5 - Add our first GraphQL Schema
If you head over to https://api.hashnode.com you can use their API playground to author the schema code you need. It has docs where you can browse the available fields and so forth.
You can also test out the schema, and look at the results. This is what it looks like in the browser.
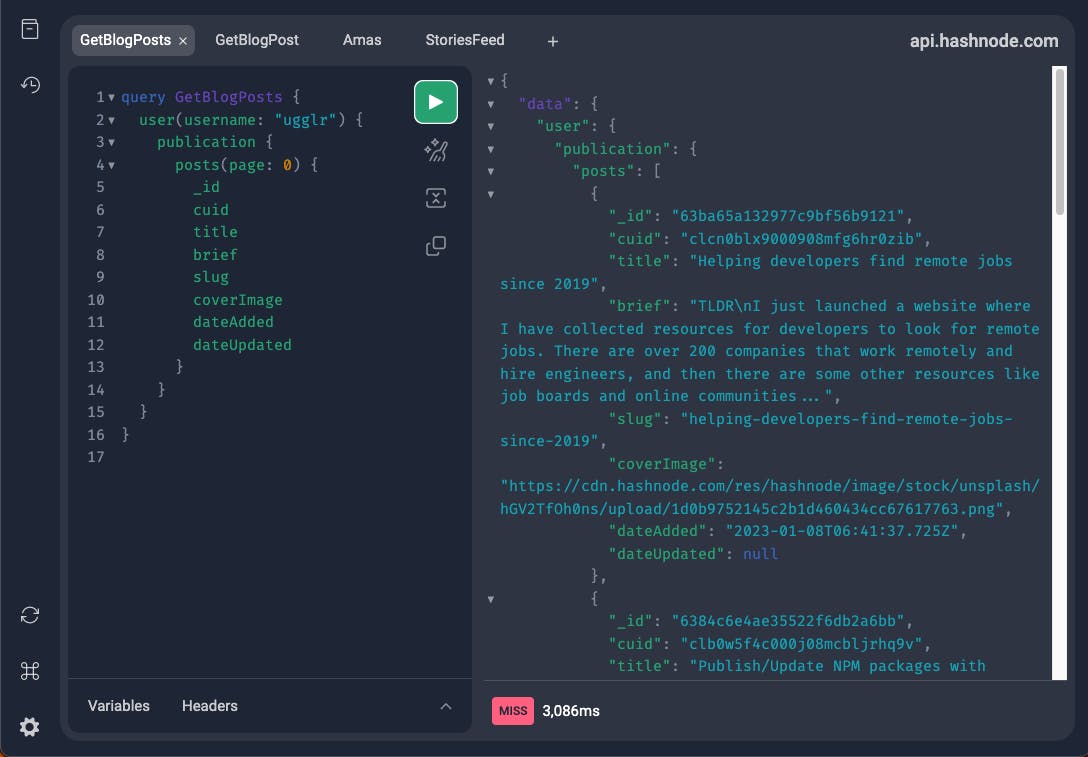
I'm grabbing the schema that I authored in the playground and adding it into a file called get-blog-posts.query.graphql inside of a folder called graphql situated in the root of the project.
It looks like this inside the file: get-blog-posts.query.graphql
query GetBlogPosts {
  user(username: "ugglr") {
    publication {
      posts(page: 0) {
        _id
        cuid
        title
        brief
        slug
        coverImage
        dateAdded
        dateUpdated
      }
    }
  }
}
If you now run the generation script you will see the following output:
yarn generate
yarn run v1.22.15
$ graphql-codegen --config graphql.codegen.yml
(node:42632) ExperimentalWarning: stream/web is an experimental feature. This feature could change at any time
(Use `node --trace-warnings ...` to show where the warning was created)
✔ Parse Configuration
✔ Generate outputs
✨  Done in 3.30s.
Further, you will see a new folder pop up in your root directory called generated with a file called graphql.ts. This glorious file now holds all the type annotations we need to continue building our application.
For instance, we can look at the Post-type which looks like this:
export type Post = {
  __typename?: 'Post';
  _id: Scalars['ID'];
  author?: Maybe<User>;
  bookmarkedIn?: Maybe<Array<Maybe<Scalars['String']>>>;
  brief?: Maybe<Scalars['String']>;
  contentMarkdown?: Maybe<Scalars['String']>;
  contributors?: Maybe<Array<Maybe<Contributor>>>;
  coverImage: Scalars['String'];
  cuid?: Maybe<Scalars['String']>;
  dateAdded?: Maybe<Scalars['String']>;
  dateFeatured?: Maybe<Scalars['String']>;
  dateUpdated?: Maybe<Scalars['String']>;
  followersCount?: Maybe<Scalars['Int']>;
  isActive?: Maybe<Scalars['Boolean']>;
  isAnonymous?: Maybe<Scalars['Boolean']>;
  numUniqueUsersWhoReacted?: Maybe<Scalars['Int']>;
  partOfPublication?: Maybe<Scalars['Boolean']>;
  poll?: Maybe<Poll>;
  popularity?: Maybe<Scalars['Float']>;
  reactions?: Maybe<Array<Maybe<Reaction>>>;
  reactionsByCurrentUser?: Maybe<Array<Maybe<Reaction>>>;
  replyCount?: Maybe<Scalars['Int']>;
  responseCount?: Maybe<Scalars['Int']>;
  slug?: Maybe<Scalars['String']>;
  tags?: Maybe<Array<Maybe<Tag>>>;
  title?: Maybe<Scalars['String']>;
  totalReactions?: Maybe<Scalars['Int']>;
  type: Scalars['String'];
};
This file will be updated every time we run the code generation script.
We are now ready to start building our index page with the list of all the posts.
Fetch blog posts using `getStaticProps`
Since we are building a static blog we are going to use getStaticProps for passing the posts into our react component via props. Seasoned Next.js users will know exactly the workflow ahead.
I am now cleaning out the default code that Next.js generated for us inside the index.tsx file in the pages directory. Further, I am implementing the static data fetching method at the bottom by exporting a async function called getStaticProps.
After I'm done it looks like this.
pages/index.tsx
import Head from "next/head";
import styles from "@/styles/Home.module.css";
import { createClient } from "@/lib/apollo";
import {
  GetBlogPostsDocument,
  GetBlogPostsQuery,
  GetBlogPostsQueryVariables,
  Post,
} from "@/generated/graphql";
import { NextPage } from "next";
import Link from "next/link";

type Props = {
  posts: Post[];
};
const HomePage: NextPage<Props> = ({ posts }) => (
  <>
    <Head>
      <title>Create Next App</title>
      <meta name="description" content="Generated by create next app" />
      <meta name="viewport" content="width=device-width, initial-scale=1" />
      <link rel="icon" href="/favicon.ico" />
    </Head>
    <main className={styles.main}>
      <div style={{ padding: "2rem" }}>
        <h1>My Hashnode Blog</h1>
        <p>Powered by React, Typescript and, GraphQL</p>
      </div>

      <div>
        {posts.map((post) => (
          <div key={post._id} style={{ padding: "2rem" }}>
            <p>{post.title}</p>
            <Link
              target="_blank"
              href={`/${post.slug}`}
              style={{ textDecoration: "underline", color: "pink" }}
            >
              Read more 🚀
            </Link>
          </div>
        ))}
      </div>
    </main>
  </>
);

export default HomePage;

export const getStaticProps = async () => {
  const client = createClient();

  const { data } = await client.query<
    GetBlogPostsQuery,
    GetBlogPostsQueryVariables
  >({ query: GetBlogPostsDocument });

  const posts = data.user?.publication?.posts ?? [];

  return {
    props: {
      posts,
    },
  };
};
See! Type safe end-to-end and no Types were manually typed by us 🤩 In a larger project this will save a lot of time squashing bugs.
This looks like this in my browser:

Now that we have our list of posts we need to start generating our individual pages, this is done by using a very common technique in Next.js by using the getStaticProps + getStaticPaths + dynamic routing pattern.
Prepare fetching individual posts from the Hashnode API.
First things first, let's head over to the Hashnode API playground again and auth the schema we need for fetching individual posts.
This is the schema I'm grabbing from their playground:
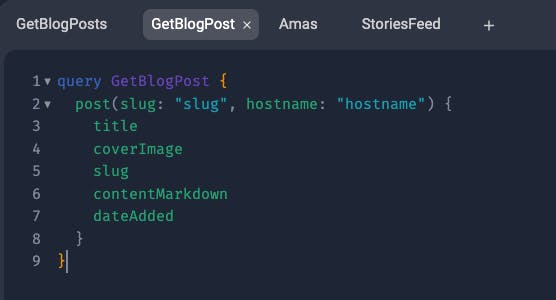
After that, I'm creating a new file inside of our graphql folder called get-blog-post.query.graphql and I'm modifying it so that I can pass it variables.
query GetBlogPost($slug: String!, $hostname: String!) {
  post(slug: $slug, hostname: $hostname) {
    title
    coverImage
    slug
    contentMarkdown
    dateAdded
  }
}
Where slug is the slug of your post on the Hashnode website, and hostname is your main address on Hashnode. An easy way to find it is by opening the profile context menu in the top navbar.
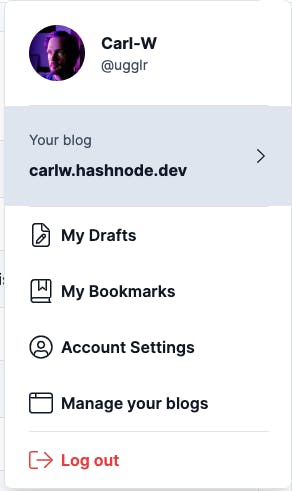
In my case, the hostname is carlw.hashnode.dev . We are making progress at rocket speed 🚀
Dont forget to validate your schema and generate the types by running:
yarn generate
Generate Individual static pages for each blog post
First, create a file in the pages directory called [slug].tsx this is how we tell Next.js that the content shall change based on the url
Read the official docs here getStaticPaths-docs.
The Code will run like this:
First the
getStaticPathsfunction will fetch all slugs for our blog posts, and tell Next.js that we want to generate static pages for each path we return.Second the
getStaticPropsfunction will fetch all the data we need to create the static page.
Once implemented it looks like this in my code:
pages/[slug].tsx
import { NextPage } from "next";
import { createClient } from "@/lib/apollo";

import {
  GetBlogPostDocument,
  GetBlogPostQuery,
  GetBlogPostQueryVariables,
  GetBlogPostsDocument,
  GetBlogPostsQuery,
  GetBlogPostsQueryVariables,
  PostDetailed,
} from "@/generated/graphql";


type Props = {
  post: PostDetailed;
};
const BlogPage: NextPage<Props> = ({ post }) => {
  return (
    <div>
      <main>
        <h1>{post.title}</h1>
        <p>{post.dateAdded}</p>
        {post.tags?.map((tag, index) => (
          <p key={`${tag ?? index}`}>{tag?.__typename}</p>
        ))}
        <p>{post.contentMarkdown}</p>
      </main>
    </div>
  );
};

export default BlogPage;

type Path = {
  params: {
    slug: string;
  };
};

type StaticPaths = {
  paths: { params: { slug: string | null | undefined } }[] | undefined;
  fallback: boolean;
};
export const getStaticPaths = async (): Promise<StaticPaths> => {
  const client = createClient();

  const { data } = await client.query<
    GetBlogPostsQuery,
    GetBlogPostsQueryVariables
  >({ query: GetBlogPostsDocument });

  let paths;
  const posts = data.user?.publication?.posts;

  if (posts) {
    paths = data.user?.publication?.posts?.map((post) => {
      return {
        params: {
          slug: post?.slug,
        },
      };
    });
  }

  return {
    paths,
    fallback: false,
  };
};

export const getStaticProps = async ({ params }: Path) => {
  const client = createClient();

  const { data } = await client.query<
    GetBlogPostQuery,
    GetBlogPostQueryVariables
  >({
    query: GetBlogPostDocument,
    variables: {
      slug: params.slug,
      hostname: "carlw.hashnode.dev",
    },
  });

  const post = data.post;

  return {
    props: {
      post,
    },
  };
};
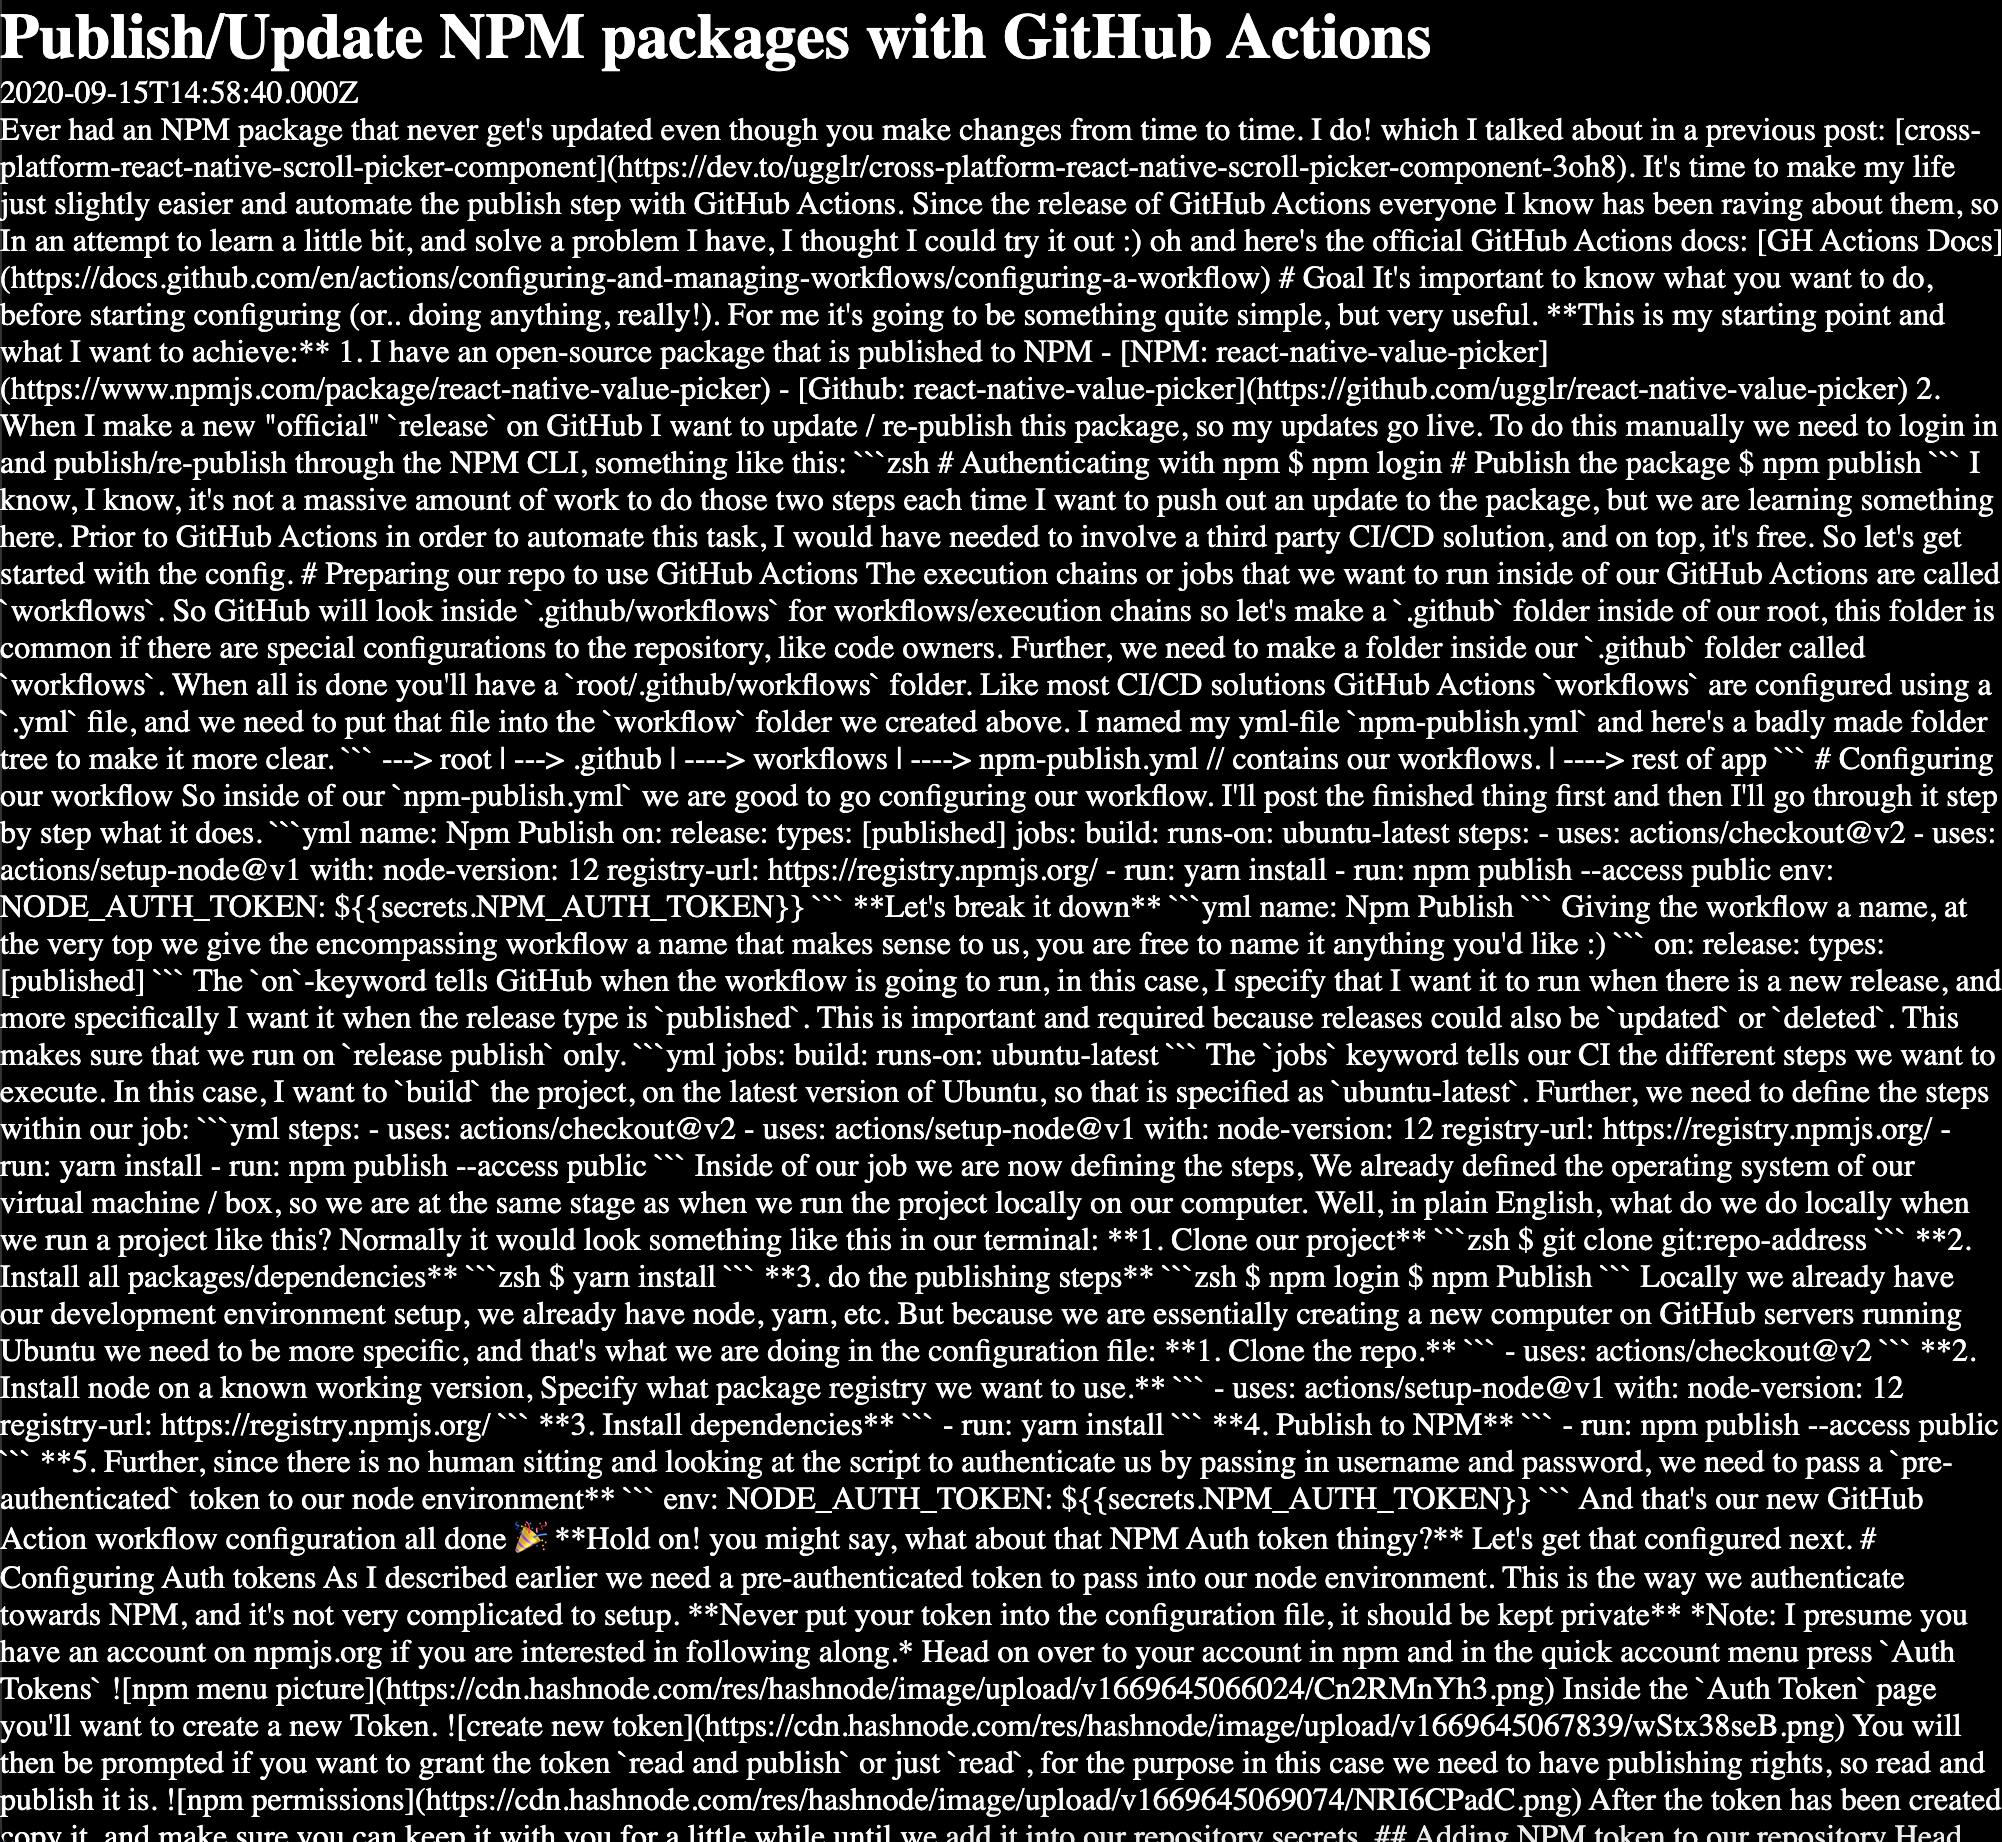
This will result in a beautiful soup that looks something like this when visiting one of the pages: (I said, in the beginning, I'm not going to go into styling 👀). The content comes in as markdown, so after this you will need to install a markdown viewer and then render the content out to your page.
And if you run the Next.js build script you will see the following output:
yarn build
yarn run v1.22.15
$ next build
info  - Linting and checking validity of types
info  - Creating an optimized production build
info  - Compiled successfully
info  - Collecting page data
info  - Generating static pages (9/9)
info  - Finalizing page optimization

Route (pages)                                                                                               Size     First Load JS
┌ ● / (2379 ms)                                                                                             2.75 kB        75.9 kB
├   └ css/ad31fca617ac0c09.css                                                                              1.33 kB
├   /_app                                                                                                   0 B            73.1 kB
├ ● /[slug] (11386 ms)                                                                                      406 B          73.5 kB
├   ├ /react-functional-components-const-vs-function (2450 ms)
├   ├ /react-native-getting-user-device-timezone-and-converting-utc-time-stamps-using-the-offset (2357 ms)
├   ├ /tutorial-write-a-re-useable-react-native-component-and-test-it-with-jest (2263 ms)
├   ├ /helping-developers-find-remote-jobs-since-2019 (1459 ms)
├   ├ /publishupdate-npm-packages-with-github-actions (1429 ms)
├   └ /adding-animations-to-your-react-project-using-lottie (1428 ms)
├ ○ /404                                                                                                    181 B          73.3 kB
└ λ /api/hello                                                                                              0 B            73.1 kB
+ First Load JS shared by all                                                                               73.8 kB
  ├ chunks/framework-2c79e2a64abdb08b.js                                                                    45.2 kB
  ├ chunks/main-f11614d8aa7ee555.js                                                                         26.8 kB
  ├ chunks/pages/_app-891652dd44e1e4e1.js                                                                   296 B
  ├ chunks/webpack-8fa1640cc84ba8fe.js                                                                      750 B
  └ css/876d048b5dab7c28.css                                                                                706 B

λ  (Server)  server-side renders at runtime (uses getInitialProps or getServerSideProps)
○  (Static)  automatically rendered as static HTML (uses no initial props)
●  (SSG)     automatically generated as static HTML + JSON (uses getStaticProps)

✨  Done in 17.63s.
As you can see it generated several pages under the [slug] route, these pages are now static and will be hosted as your other pages.
Success 🚀
I have now demonstrated how you can start building your very own blog or add blog pages to an already existing Next.js project. Type-safe and schema validated using the Hashnode API. Cool right!
For reference, you can see the whole source code here on GitHub 🤓
https://github.com/ugglr/nextjs-hashnode-graphql-blog
About me
If you found this helpful please consider subscribing and following 🤩. That will motivate me to create more content like this. I'm currently available to hire as a freelancer under my own brand so If you are looking for an engineer to power your next project, look no further. Please visit my site to learn more:
My site: 👉 https://carlw.se
Twitter: 👉 https://twitter.com/ugglr_dev
LinkedIn: 👉 https://www.linkedin.com/in/igelstrom
I'm also building a project for finding remote engineering jobs listing remote companies and other resources, so if that sounds interesting check it out on:
The internet: 👉 https://remoet.dev
Twitter: 👉 https://twitter.com/remoet_dev
Linkedin: 👉 https://www.linkedin.com/company/remoet-dev